User Guide
NeoBook is a desktop app for managing contacts, optimized for use via a Command Line Interface (CLI) while still having the benefits of a Graphical User Interface (GUI). If you can type fast, it can get your contact management tasks done faster than traditional GUI apps.
Apart from being your all-encompassing address book, NeoBook also has an Events function for you to keep track of your daily schedule.
Table Of Contents
- Table Of Contents
- Getting started
- How to read the User Guide
- User Interface
-
Address Book Features
- Introduction
-
Viewing Help :
help -
Adding A New Contact :
add -
Listing All Contacts :
list -
Favourite A Contact :
fav -
Unfavourite A Contact :
unfav -
Editing a contact’s details :
edit -
Finding Particular Contacts :
find -
Select contact to expand details :
select -
Deleting A Contact :
delete -
Clearing all contacts :
clear -
Exiting NeoBook :
exit - Address Book Command Summary
- Events Features
- User Features
- UI Features
- Data
- FAQ
- Future Plans
Getting started
-
Ensure you have Java
11or above installed in your Computer. -
Download the latest
neobook.jarfrom here. -
Copy the file to the folder you want to use as the home folder for your NeoBook.
-
Open a command terminal,
cdinto the folder you put the jar file in, and use thejava -jar neobook.jarcommand to run the application.
A GUI similar to the below should appear in a few seconds. Note how the app contains some sample data.
-
Type the command in the command box and press Enter to execute it. e.g. typing
helpand pressing Enter will open the help window.
Some example commands you can try:-
list: Lists all contacts. -
add n/John Doe p/98765432 e/johnd@example.com a/John street, block 123, #01-01: Adds a contact namedJohn Doeto the Address Book. -
delete 3: Deletes the 3rd contact shown in the current list. -
edit 3 n/pierce: Edits the 3rd contact’s name on the current list to pierce -
tab 2: Navigates to the events tab -
addevent d/Do Work! s/2023-04-10 1200 e/2023-04-10 1400 r/Daily: Adds an event with a description of “Do work!” on 2023-04-10 from 1200 to 1400 and will recur daily. -
tab 1: Navigates to the contacts tab -
clear: Deletes all contacts. -
exit: Exits the app.
-
-
Refer to the NeoBook Features below for details of each command.
How to read the User Guide
 Notes about the command format:
-
Words in
UPPER_CASEare the parameters to be supplied by the user.
e.g. inadd n/NAME,NAMEis a parameter which can be used asadd n/John Doe. -
Items in square brackets are optional.
e.gn/NAME [t/TAG]can be used asn/John Doe t/friendor asn/John Doe. -
Items with
…after them can be used multiple times including zero times.
e.g.t/TAG…means that we can exclude the tag prefix completely or use it ast/friend,t/friend t/familyetc. -
Items in
{ }and have a…followed after them must be used at least once, and can be used multiple times.
e.g. Foreditevent INDEX {PREFIX/PARAMETER}…will alloweditevent 1 r/Weeklyoreditevent 2 d/Do work r/Daily, but noteditevent 1. -
Parameters can be in any order.
e.g. if the command specifiesn/NAME p/PHONE_NUMBER,p/PHONE_NUMBER n/NAMEis also acceptable. -
If a parameter, which isn’t a FieldGroup, is expected only once in the command but you specified it multiple times, only the last occurrence of the parameter will be taken.
e.g. Since Phone is just a normal field, if you specifyp/12341234 p/56785678, onlyp/56785678will be taken.
e.g. Since Modules is a FieldGroup, if you specifymt/CS1231S mt/CS2040S, all will be taken unlike the previous example. -
Extraneous parameters for commands that do not take in parameters (such as
help,list,exitandclear) will be ignored.
e.g. if the command specifieshelp 123, it will be interpreted ashelp.
User Interface
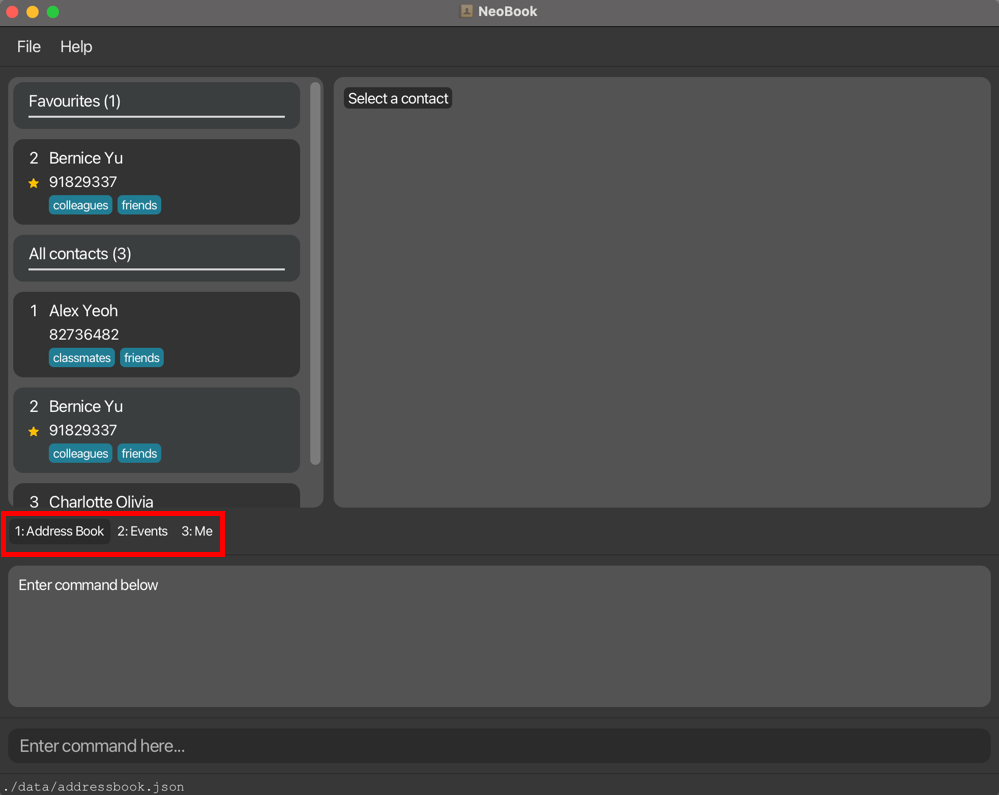
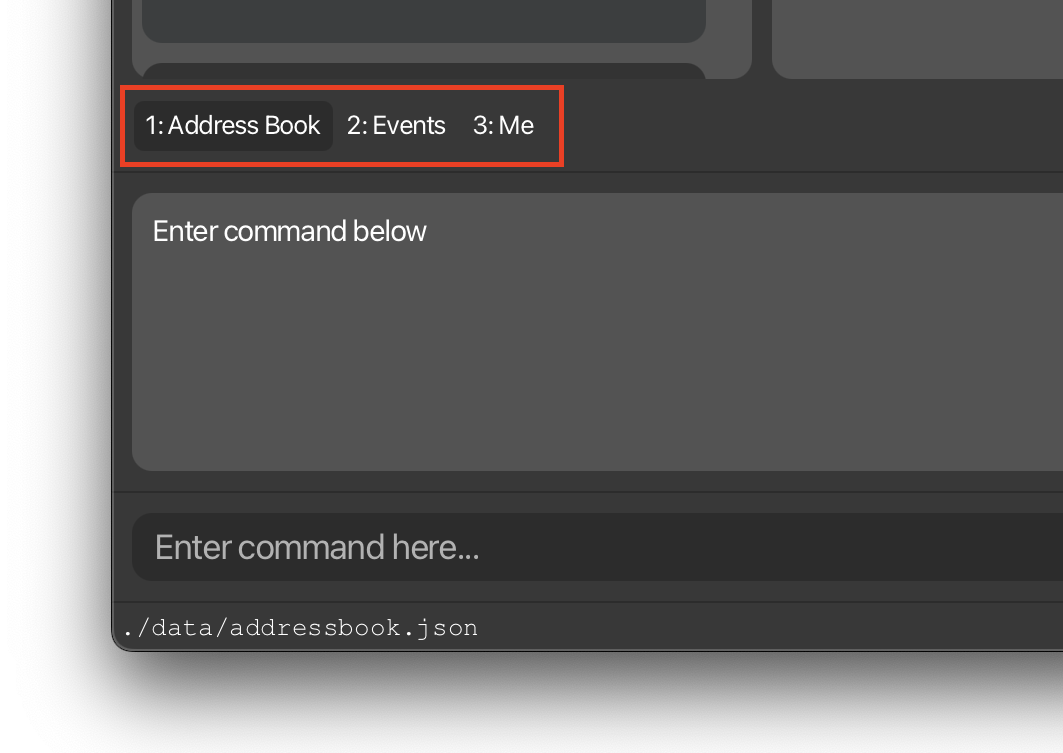
UI Breakdown For Tabs
Use these tabs to toggle between the NeoBook, Events and your own information!
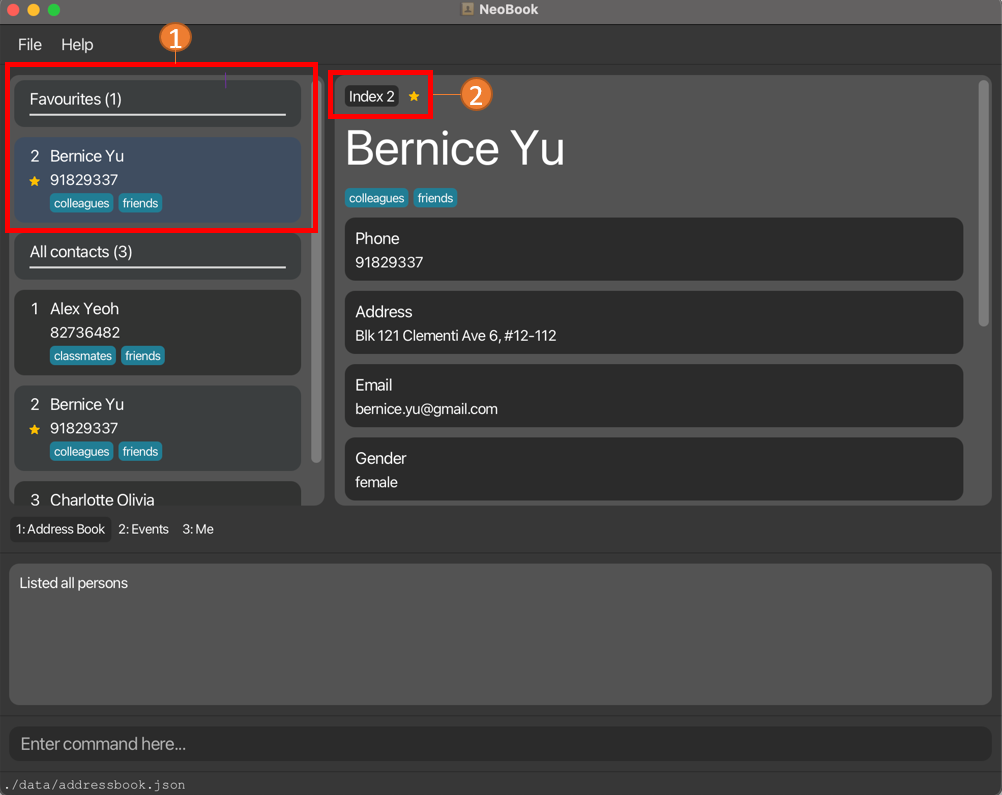
UI Breakdown For Address Book
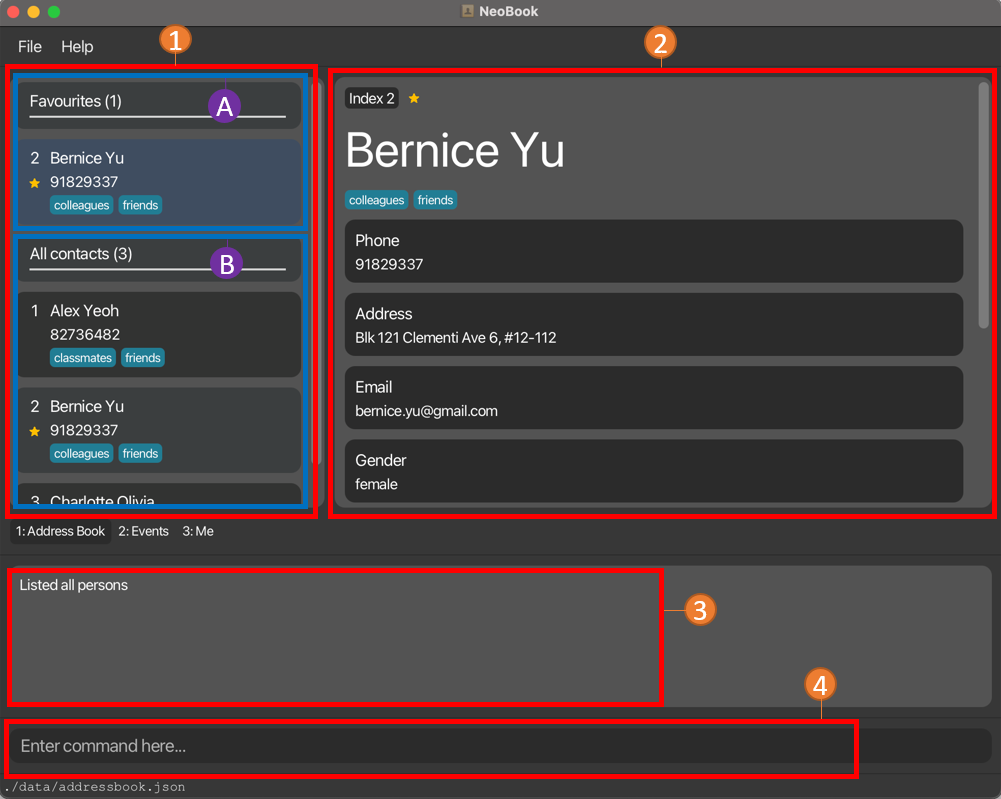
- Current Displayed List
- Show contacts based on command parameters
- Contains the
indexyou should use to refer to each contact - A : Contains favorite contacts for easy access
- B : Contains all contacts
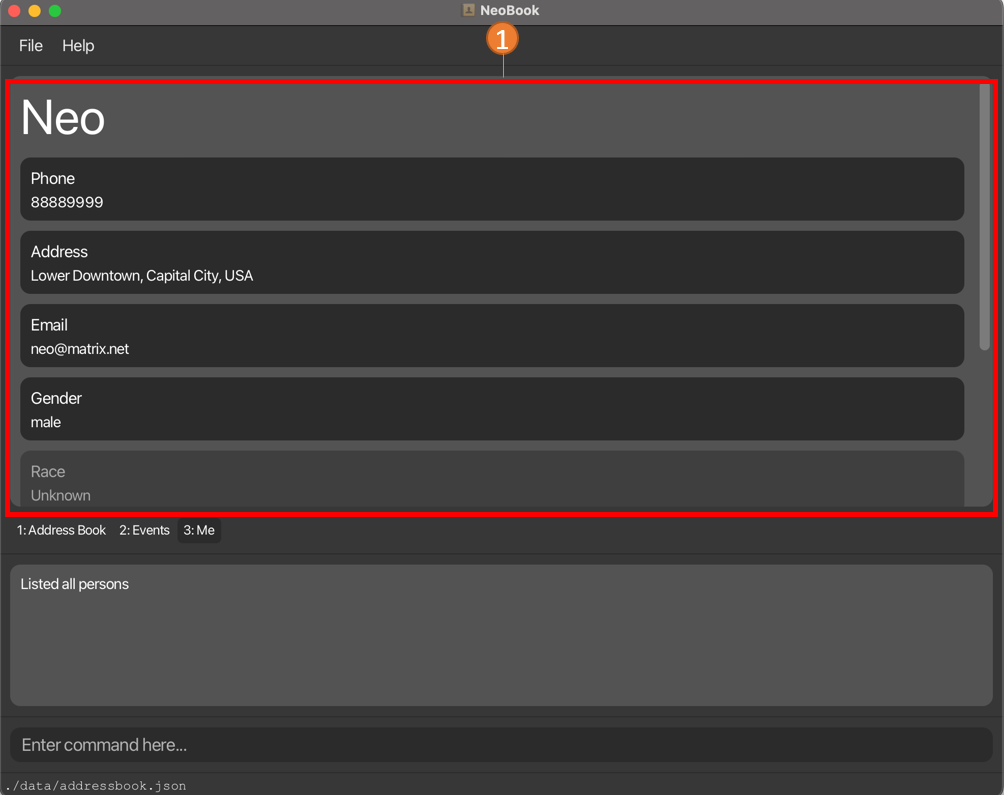
- Information Of Specific Contact
- Displays all the saved information related to contact
- Toggle between different contacts by clicking on them in the displayed list or using the select command
- Command Results:
- Displays the result of input command
- Command Line:
- Type command and press enter to execute it
- Refer to the NeoBook Features below for possible commands to execute
UI Breakdown For Events
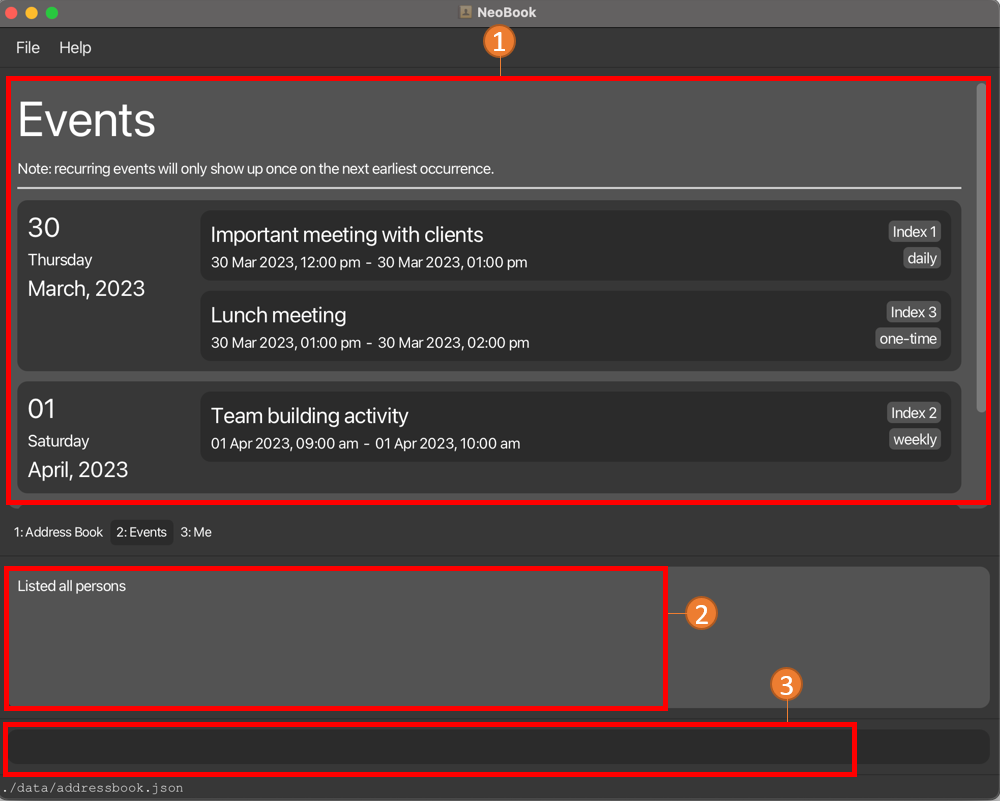
- Events Display
- Displays all events you have saved and their respective details
- Command Results:
- Displays the result of input command
- Command Line
- Type a command and press enter to execute it
- Refer to the Events Features below for possible commands to execute
UI Breakdown For Me
- Display
- Contains your personal details
Address Book Features
Introduction
Listed below are all the commands one can do to interact with the address book tab. Try them out for yourself today!
Viewing Help : help
Don’t know how to get started? Don’t worry!
Simply use this command to get access to our help page!
Syntax
help
Description
Use this command when you need help!
Image
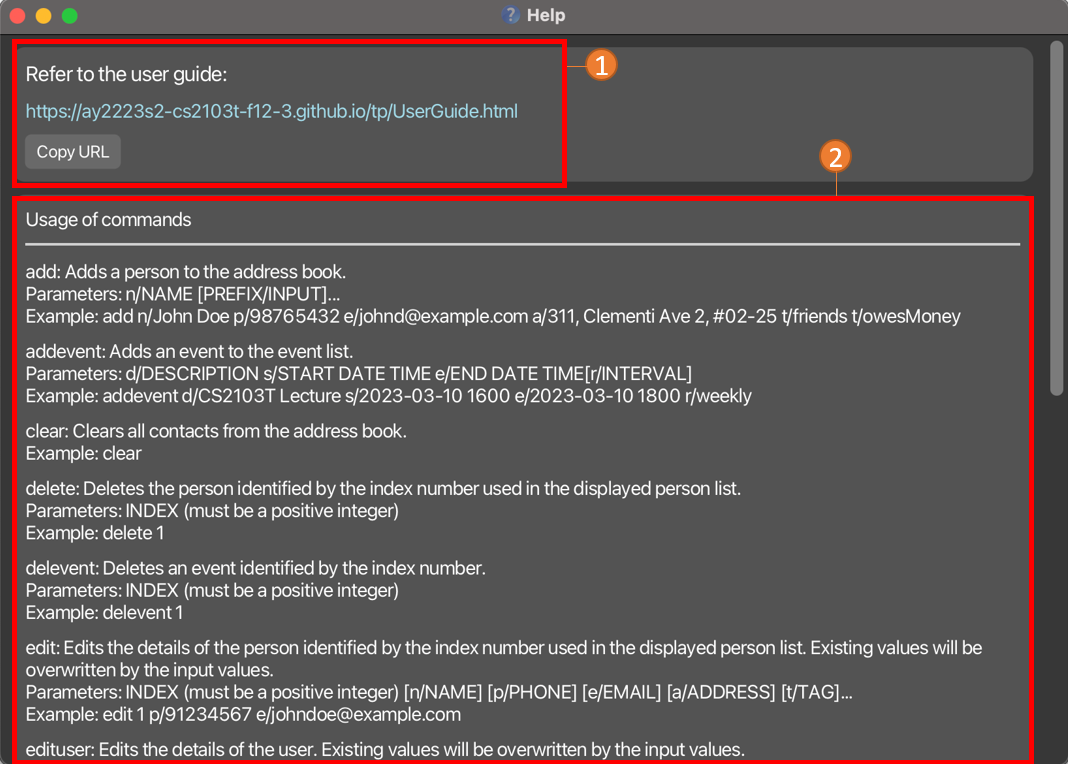
- Links to the user guide you are reading right now!
- A list of all commands and their example usages.
Adding A New Contact : add
Met a new friend?
Use this command to add him/her to your NeoBook.
Syntax
add n/NAME PREFIX/PARAMETER…
Description
Here are all the prefixes that can be used:
| Prefix | Name of Field | Optional? |
|---|---|---|
| n | Name | No |
| e | Email address | Yes |
| p | Phone Number | Yes |
| a | Address | Yes |
| m | Major | Yes |
| mt | Mods Taken | Yes |
| f | Faculty | Yes |
| g | Gender | Yes |
| r | Race | Yes |
| t | Tags | Yes |
| c | Preferred Communication Channel | Yes |
Example Usages
add n/John Doe p/98765432 e/johnd@example.com a/John street, block 123, #01-01add n/Betsy Crowe t/friend e/betsycrowe@example.com mt/CS2030s mt/CS2103T
Extra Notes
- If said contact identifies himself as a gender that is two words or is hyphenated like “non-binary”, you can save his
Genderasnonbinary.
Listing All Contacts : list
Want to see all your contacts?
Use this command to gain access to all of them!
Syntax
list
Favourite A Contact : fav
Contact someone very frequently?
Use this command to favourite it so that you have easy access to it!
Syntax
fav INDEX
Description
INDEX refers to the index of the contact you wish to favourite in the current displayed list.
Important Requirements
INDEX must be a positive integer (must be greater than 0).
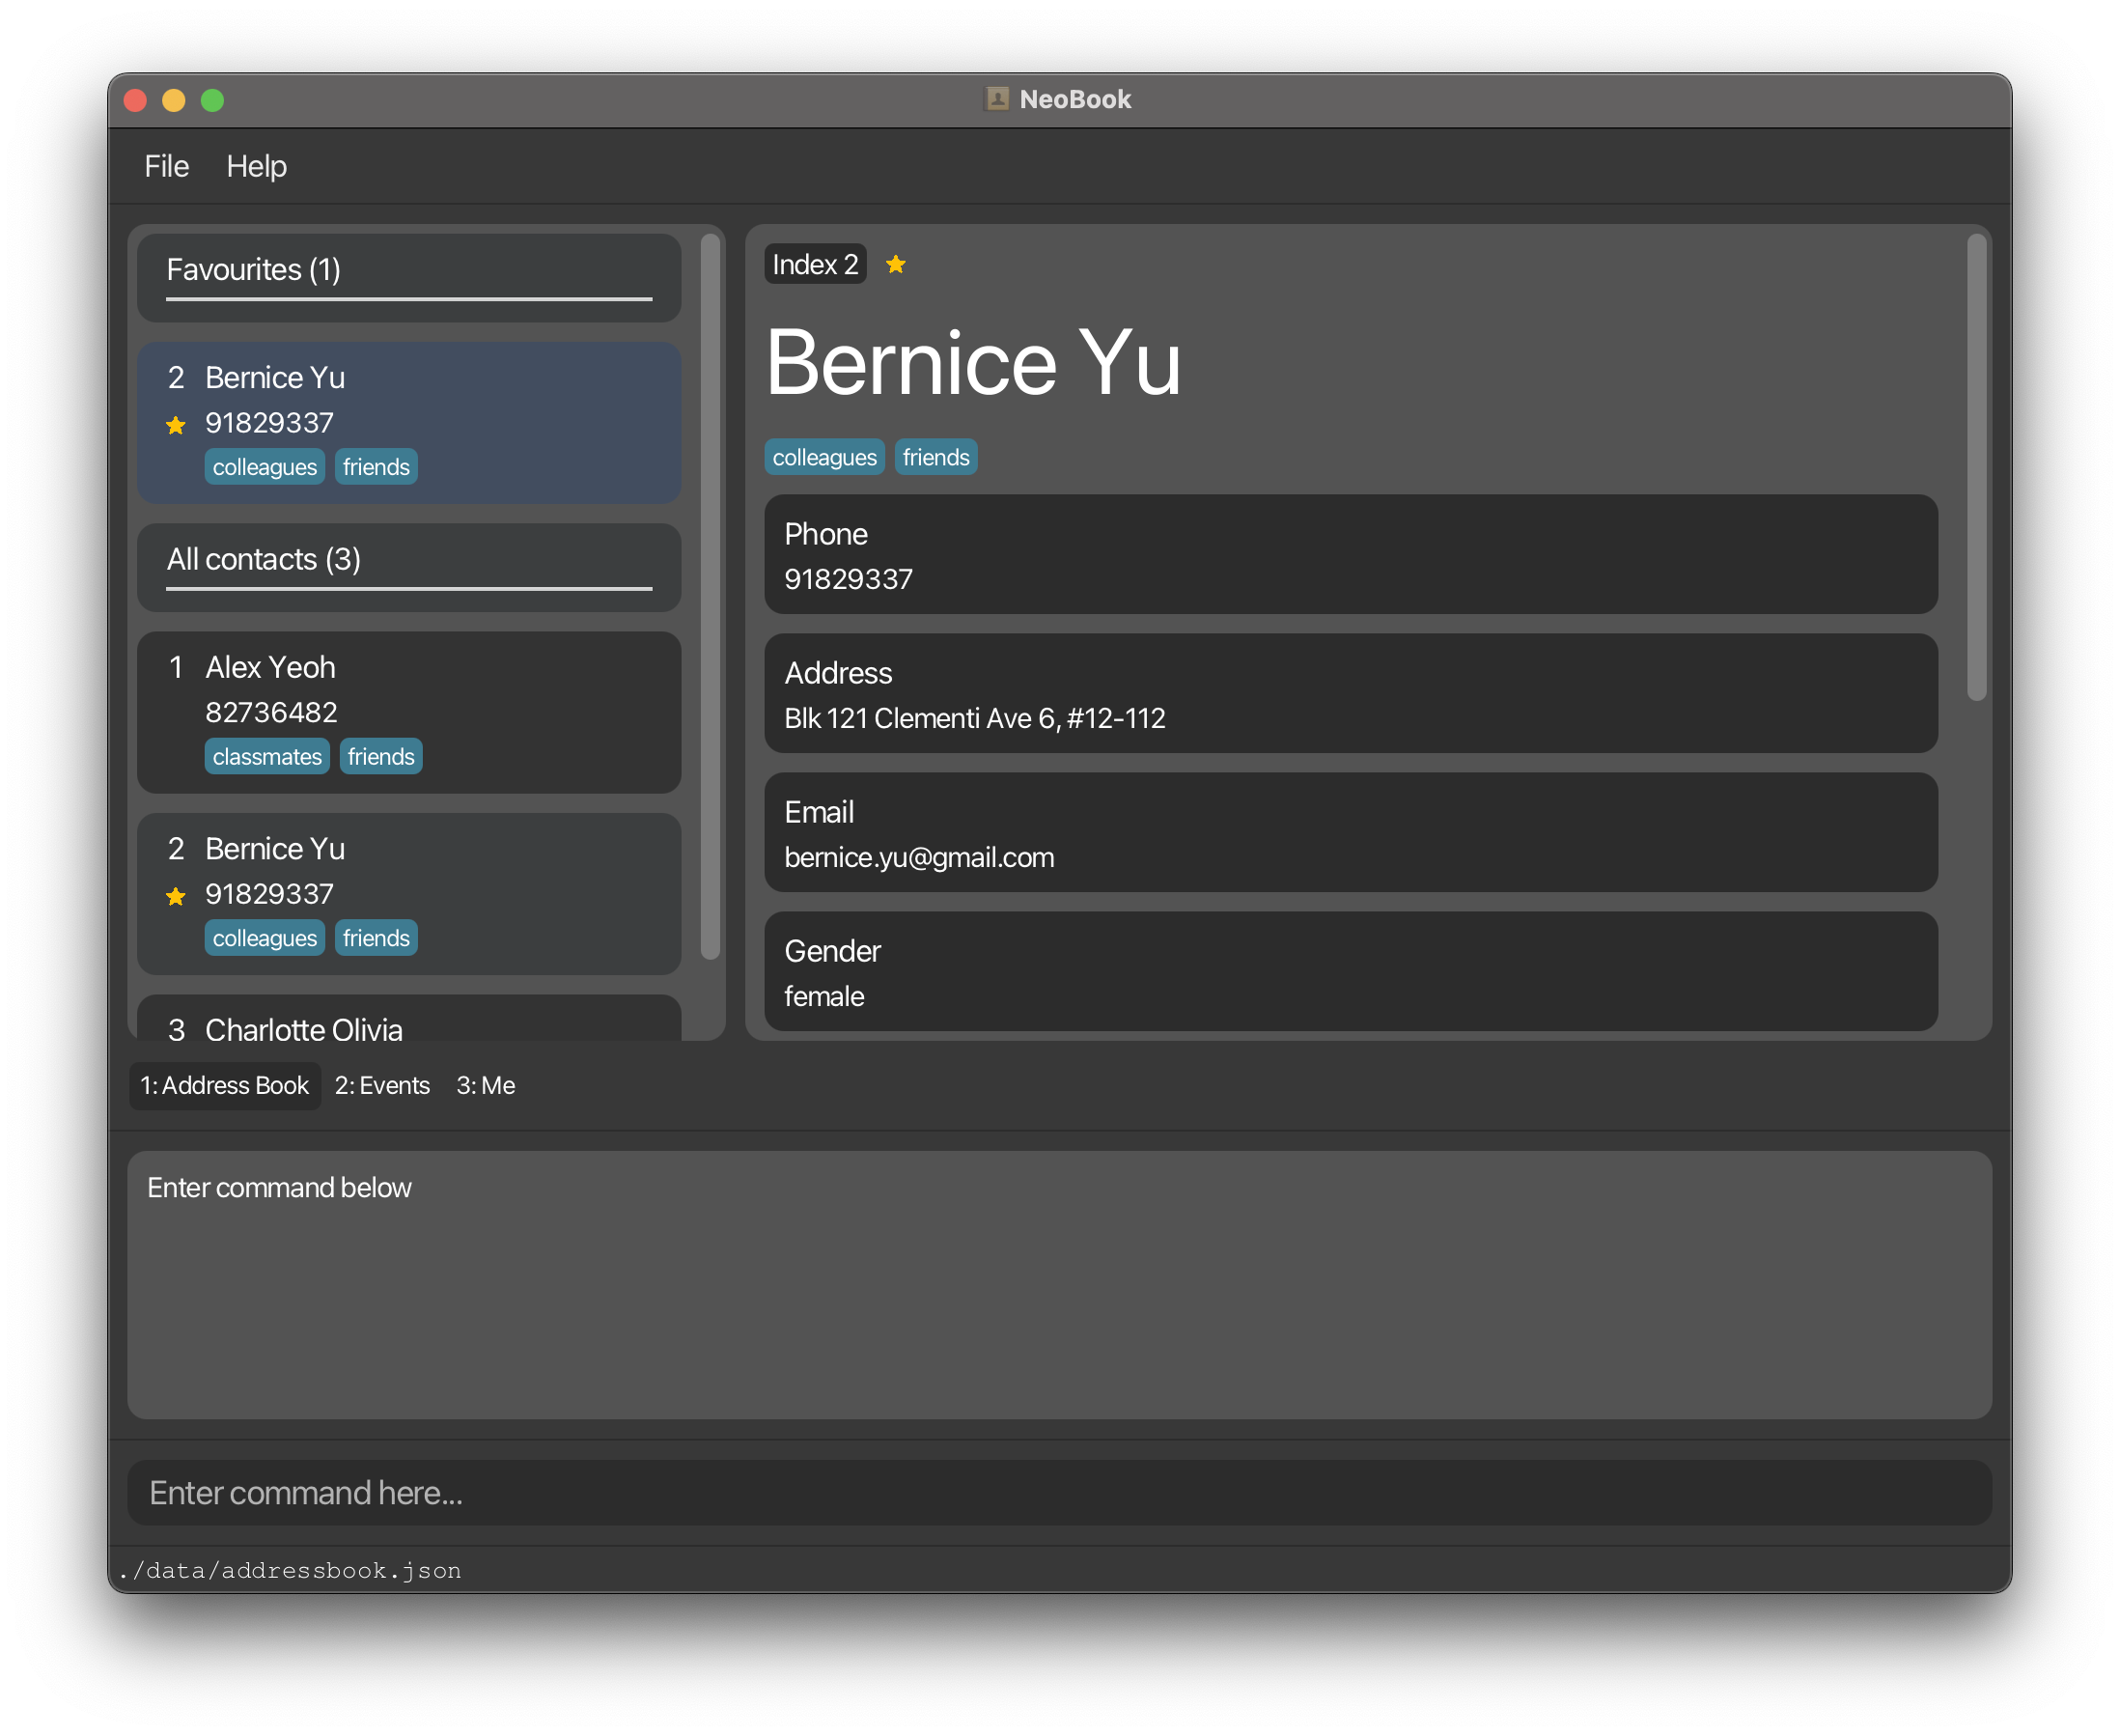
Example Image
Here’s how NeoBook would look like after you favourite a contact!
- The contact will appear in the
Favouritessection. - A
 will appear next to the index in the detail panel.
Unfavourite A Contact : unfav
No longer contact someone as frequently as you used to?
Use this command to unfavourite it!
Syntax
unfav INDEX
Description
INDEX refers to the index of the contact you wish to unfavorite in the current displayed list.
Important Requirements
INDEX must be a positive integer and (must be greater than 0).
Editing a contact’s details : edit
Learnt something new about your friend? Or perhaps he/she changed a particular detail?
Use this command to edit his/her details easily!
Syntax
edit INDEX {PREFIX/PARAMETER}…
Description
INDEX refers to the index of the contact you wish to edit in the current displayed list.
For the following fields, they are considered a FieldGroup.
- Modules
- Tags
A FieldGroup can contain many parameters in that single field.
When using edit, the command looks for each parameter in the FieldGroup:
- If the parameter already exists in the
FieldGroupit will be removed. - Otherwise, the parameter will be added into the
FieldGroup.
Important requirements
INDEX must be a positive integer (must be greater than 0).
All the fields are optional. However, at least one field must be provided.
Examples Usages
The first contact has CS2103T, MA2001 and GEA1000 as its modules.
-
edit 1 mt/CS2103Tremoves CS2103T from the Modules field since it is already a part of its Modules field. - So the first contact in your Neobook will have
MA2001andGEA1000as its only modules
The second contact has the following tags Friend, Amazing Coder
-
edit 2 t/10x Coder t/Intern Friendadds both10x CoderandIntern Friendas tags to the contact as neither existed in its Tags field. - So the second contact in your NeoBook would have
Friend,Amazing Coder,10x CoderandIntern Friendin its Tags field.
| Prefix | Name of Field | Optional? |
|---|---|---|
| n | Name | Yes |
| e | Email address | Yes |
| p | Phone Number | Yes |
| a | Address | Yes |
| m | Major | Yes |
| mt | Mods Taken | Yes |
| f | Faculty | Yes |
| g | Gender | Yes |
| r | Race | Yes |
| t | Tags | Yes |
| c | Preferred Communication Channel | Yes |
Example Usages:
-
edit 1 p/91234567 e/johndoe@example.comEdits the phone number and email address of the 1st person to be91234567andjohndoe@example.comrespectively. -
edit 2 n/Betsy Crower t/MarineEdits the name of the 2nd person to beBetsy Crowerand adds the tagMarineif it does not yet exist. If the tagMarinealready exists on the contact, then it will be removed.
Extra Notes
- If said contact identifies himself as a gender that is two words or is hyphenated like “non-binary”, you can save his
Genderasnonbinary.
Finding Particular Contacts : find
Want to narrow down your displayed contacts to a certain few?
Use this command to find contacts by specifying the fields and corresponding keywords you wish to search!
Syntax
find {PREFIX/KEYWORD}…
Description
KEYWORD can contain more than 1 word.
E.g find n/Peter James
| Prefix | Name of Field | Optional? |
|---|---|---|
| n | Name | Yes |
| e | Email address | Yes |
| p | Phone Number | Yes |
| a | Address | Yes |
| m | Major | Yes |
| mt | Mods Taken | Yes |
| f | Faculty | Yes |
| g | Gender | Yes |
| r | Race | Yes |
| t | Tags | Yes |
| c | Preferred Communication Channel | Yes |
Above are all the prefixes you can use to find a Contact according to their fields.
Important Requirements
- At least 1 field and corresponding keyword must be specified.
- i.e
find PREFIX/KEYWORD
- i.e
- The keywords are case-insensitive.
- i.e.
find n/Abigailcan return people with names of ‘Abigail’, ‘aBiGail’, ‘abigail’, ‘ABIGAIL’.
- i.e.
- If multiple same prefixes are specified, as long as one of the keyword is contained
in the corresponding field, the person will be returned.
- i.e.
find n/John n/Peter James- Keywords:
john,peter james- Can return:
- People with names of ‘John’, ‘Peter James’, ‘Peter James John’
- Cannot return:
- A person with name of ‘Peter’
- Can return:
- Keywords:
- i.e.
- All unique prefixes specified must be contained within the corresponding fields of the person
for that person to be returned.
- i.e.
find n/Caleb p/9123- Can return:
- A person with a name of ‘Caleb’ who has a phone number of ‘91234567’
- Cannot return:
- A person whose name is ‘Caleb’ but has a phone number of ‘98765432’
- A person whose name is ‘Joshua’ even though his phone number is ‘91234567’
- Can return:
- i.e.
- At least one field must be provided.
Select contact to expand details : select
Want to see more details about a certain contact in your list?
Use this command to expand and view more information about the selected contact.
Syntax
select INDEX
Description
-
INDEXrefers to the index of the contact you wish to view more information on.
Important requirements
-
INDEXmust be a positive integer (must be greater than 0).
Example Usages
-
select 1expands the details of the first contact in your list. -
select 4expands the details of the fourth contact in your list.
Deleting A Contact : delete
No longer interact with someone in your contacts?
Use this command to delete the specified contact from your NeoBook.
Syntax
delete INDEX
Description
INDEX refers to the index of the contact you wish to delete in the current displayed list.
Important Requirements
INDEX must be a positive integer and (must be greater than 0).
Example Usages
-
listfollowed bydelete 2deletes the 2nd person in the displayed list. -
find Betsyfollowed bydelete 1deletes the 1st person in the results of thefindcommand.
Clearing all contacts : clear
Want to start from a clean slate?
Simply use this command to clear all contacts from your NeoBook.
Syntax
clear
Exiting NeoBook : exit
Finished what you needed to do?
Use this command to exit the application!
Syntax
exit
Address Book Command Summary
| Action | Format, Examples |
|---|---|
| Add |
add n/NAME PREFIX/PARAMETER… e.g., add n/James Ho p/22224444 e/jamesho@example.com a/123, Clementi Rd, 1234665 t/friend t/colleague
|
| Clear | clear |
| Delete |
delete INDEXe.g., delete 3
|
| Edit |
edit INDEX {PREFIX/PARAMETERS}…e.g., edit 2 n/James Lee e/jameslee@example.com
|
| Fav |
fav INDEXe.g., fav 2
|
| Unfav |
unfav INDEXe.g., unfav 2
|
| Find |
find {PREFIX/KEYWORD}…e.g., find n/James Jake mt/CS2103T a/Serangon Central
|
| Select |
select INDEX e.g., select 2
|
| List | list |
| Help | help |
| Exit | exit |
Events Features
Notes about the command format:
Events have 4 components to them
- Description
- StartDateTime
- EndDateTime
- Recurrence
Events will automatically update to their next earliest occurrence for recurring events.
One-time events will be automatically grayed out once the event has been passed.
In the case where a one-time event is supposed to be greyed out (i.e. the current time is 2359 and the event is set to end at 2358 on the same day), then inputting any command will update the event to grey.
Adding an Event : addevent
Want to keep track of current events?
Use this command to add events into your Event Section of your NeoBook.
Syntax
addevent d/DESCRIPTION OF EVENT s/START DATE & START TIME e/END DATE & END TIME [r/INTERVAL OF RECURRENCE]
Description
| Prefix | Name of Field | Optional? |
|---|---|---|
| d | Description of Event | No |
| s | Start Date and Time of Event | No |
| e | End Date and Time of Event | No |
| r | Recurrence Interval | Yes |
You can add 2 types of Events:
- One Time Events
- Recurring Events (of various Intervals):
- Daily Events
- Weekly Events
- Monthly Events
- Yearly Events
You can specify the Recurrence Intervals within the Command as well!
Accepted Intervals:
- None
- Daily
- Weekly
- Monthly
- Yearly
Important requirements
-
START DATE & START TIMEandEND DATE & END TIMEmust follow this formatting YYYY-MM-DD HHMM.-
START TIMEandEND TIMEfollows the 24-Hour Clock format e.g. instead of 6:00pm, you must enter 1800. -
START DATE & START TIMEmust be beforeEND DATE & END TIME - If the year is not a Leap Year, inputting
29-02-YYYYwill get bumped down to28-02-YYYYfor bothSTART DATEandEND DATE - If the month has only 30 days, inputting
31-MM-YYYYwill get bumped down to30-MM-YYYYfor bothSTART DATEandEND DATE -
2400is also accepted as an input forSTART TIMEandEND TIME, this will roll the date input by the user to the next day e.g. Inputting2023-03-10 2400will be accepted and will be rolled over to2023-03-11 0000instead.
-
-
INTERVAL OF RECURRENCEdoesn’t need to be specified to add an event- If unspecified, Event will be automatically added as a
One Time Event.
- If unspecified, Event will be automatically added as a
Extra Notes
- If the year is not a Leap Year, inputting
29-02-YYYYwill get bumped down to28-02-YYYYfor bothSTART DATEandEND DATE - If the month has only 30 days, inputting
31-MM-YYYYwill get bumped down to30-MM-YYYYfor bothSTART DATEandEND DATE -
2400is also accepted as an input forSTART TIMEandEND TIME, this will roll the date input by the user to the next day e.g. Inputting2023-03-10 2400will be accepted and will be rolled over to2023-03-11 0000instead.
Example Usages
-
addevent d/CS2103T Lecture s/2023-03-30 1600 e/2023-03-30 1800 r/weeklywill add a Weekly Recurring Event of CS2103T Lecture that occurs from 1600 to 1800, starting on 2023-03-30. -
addevent d/Catchup with John s/2023-03-30 1600 e/2023-03-30 1800 r/Nonewill add a One Time Event of Catchup with John that occurs from 1600 to 1800, on 2023-03-30. -
addevent d/Dinner with Family s/2023-03-30 1600 e/2023-03-30 1800will add a One Time Event of Dinner with Family that occurs from 1600 to 1800, on 2023-03-30.
Deleting An Event : delevent
You no longer need to track this particular event?
Use this command to delete the specified event from your NeoBook.
Syntax
delevent INDEX
Description
INDEX refers to the index of the Event you wish to delete in the current displayed Events List.
Important requirements
INDEX must be a positive integer (must be greater than 0).
Example Usage
-
delevent 2deletes the event tagged to Index 2 in your NeoBook’s Event List.
Editing An Event : editevent
Want to change the details of a particular event?
Use this command to edit the specified event in your NeoBook.
Syntax
editevent INDEX {PREFIX/PARAMETER}…
Description
INDEX refers to the index of the event you wish to edit in the current displayed list.
| Prefix | Name of Field | Optional? |
|---|---|---|
| d | Description of Event | Yes |
| s | Start Date and Time of Event | Yes |
| e | End Date and Time of Event | Yes |
| r | Recurrence Interval | Yes |
Important requirements
-
INDEXmust be a positive integer (must be greater than 0). - At least one field must be provided.
Extra Notes
- If the year is not a Leap Year, inputting
29-02-YYYYwill get bumped down to28-02-YYYYfor bothSTART DATEandEND DATE - If the month has only 30 days, inputting
31-MM-YYYYwill get bumped down to30-MM-YYYYfor bothSTART DATEandEND DATE -
2400is also accepted as an input forSTART TIMEandEND TIME, this will roll the date input by the user to the next day e.g. Inputting2023-03-10 2400will be accepted and will be rolled over to2023-03-11 0000instead.
Example Usages
-
editevent 1 d/read book r/weeklyEdits the description and recurrence of the 1st event to beread bookandweeklyrespectively. -
editevent 2 s/2023-01-01 1800 e/2023-01-02 2000Edits the start date and end date of the 1st and 2nd event to be20203-01-01 1800and2023-01-02 2000respectively.
Tagging Contacts to an Event : tagpersonevent
Want to remember who was a part of a certain event?
Tag their contacts to the event using this command!
Syntax
tagpersonevent et/EVENT INDEX pt/NAME
Description
The EVENT INDEX is the index of the event you want to tag the person to.
NAME is the name of the person you want to tag to the event.
Important requirements
- NAME is case_sensitive.
- NAME must be the name of a contact already registered in NeoBook.
Example Usages
- Suppose you have an Event at
INDEX 3withDESCRIPTION: Hackathon Meeting,START DATE & TIME: 2023-05-04 1400,END DATE & TIME: 2023-05-04 1600,RECURRENCE INTERVAL: WEEKLY

tagpersonevent et/4 pt/Baljeet FF Tags Baljeet FF to this Weekly Hackathon Meeting.

For more advanced users
- Be careful when directly editing the tagged contacts in
userdata.json. It may cause the person to become unlinked from the event completely.
Untagging Contacts from an Event : untagpersonevent
Want to remove somebody who was a part of a certain event?
Untag their contacts from the event using this command!
Syntax
untagpersonevent et/EVENT INDEX pt/NAME
Description
The EVENT INDEX is the index of the event you want to tag the person to.
NAME is the name of the person you want to untag from the event.
Important requirements
- NAME is case_sensitive.
- NAME must be the name of a contact already registered in NeoBook and tagged to that event.
Examples:
- Suppose you have an Event at
INDEX 3withDESCRIPTION: Hackathon Meeting,START DATE & TIME: 2023-05-04 1400,END DATE & TIME: 2023-05-04 1600,RECURRENCE INTERVAL: WEEKLYandBaljeet FFtagged to this Event.
untagpersonevent et/4 pt/Baljeet FF untags Baljeet FF from this Weekly Hackathon Meeting.
For more advanced users
- Be careful when directly editing the tagged contacts in
userdata.json. It may cause the person to become unlinked from the event completely.
Events Command Summary
| Action | Format, Examples |
|---|---|
| Add Event |
addevent d/DESCRIPTION OF EVENT s/START DATE & START TIME e/END DATE & END TIME [r/INTERVAL OF RECURRENCE] e.g., addevent d/CS2103T Lecture s/2023-03-30 1600 e/2023-03-30 1800 r/weekly
|
| Delete Event |
delevent INDEX e,g., delevent 1
|
| Edit Event |
editevent INDEX {PREFIX/PARAMETER}… e.g., editevent 1 d/read book e/weekly
|
| Tag Contact to Event |
tagpersonevent et/EVENT_INDEX pt/NAME e.g., tagpersonevent et/1 pt/John
|
| Untag Contact to Event |
untagpersonevent et/EVENT_INDEX pt/NAME e.g., untagpersonevent et/1 pt/John
|
User Features
Introduction
The user features are reflected under the ‘Me’ tab (tab 3).
Here, you can edit personal information about yourself, the user, which can be used in future features to streamline contact exchanging.
Editing the details of the user : edituser
Want to change one of your own details, perhaps something was out of date?
Use this command to edit your details easily!
Syntax
edituser {PREFIX/PARAMETER}…
Description
For the following fields, they are considered a FieldGroup.
- Modules
- Tags
A FieldGroup can contain many parameters in that single field.
When using edit, the command looks for each parameter in the FieldGroup:
- If the parameter already exists in the
FieldGroupit will be removed. - Otherwise, the parameter will be added into the
FieldGroup.- e.g.
edituser mt/CS2103Tremoves CS2103T from the Modules field of a contact if it already exists and adds it if it does not. - e.g.
edituser t/10x Coder t/Intern Friend- For a contact with none of the above tags, both
10x CoderandIntern Friendwill be added as tags - For a contact which has
10x Coderas a tag, he will have the10x Coderremoved andIntern Friendadded as a tag.
- For a contact with none of the above tags, both
- e.g.
| Prefix | Name of Field | Optional? |
|---|---|---|
| n | Name | Yes |
| e | Email address | Yes |
| p | Phone Number | Yes |
| a | Address | Yes |
| m | Major | Yes |
| mt | Mods Taken | Yes |
| f | Faculty | Yes |
| g | Gender | Yes |
| r | Race | Yes |
| t | Tags | Yes |
| c | Preferred Communication Channel | Yes |
Important requirements
- At least one field must be provided.
Example Usages
-
edituser p/91234567 e/johndoe@example.comEdits the user’s phone number and email address to be91234567andjohndoe@example.comrespectively. -
edituser n/Betsy Crower t/MarineEdits the user’s name to beBetsy Crowerand add the tagMarineif it has not already been tagged to the user. If it has already been tagged, then it will instead remove the tag.
Extra Notes
- Tags are not shown for the user because it is not relevant. However, you can still see them in the command results.
User Command Summary
| Action | Format, Examples |
|---|---|
| EditUser |
edituser {PREFIX/PARAMETERS}…e.g., edituser n/James Lee e/jameslee@example.com
|
UI Features
Switching between tabs : tab
Looking for a faster way to switch between NeoBook and the Events?
Use this command to navigate to the specified tab.
Syntax
tab INDEX
Description
-
INDEXrefers to the index of the tab to navigate to, shown before the name in the tab.
Important requirements
-
INDEXmust be 1, 2, or 3. -
tabrefers to the literal word to be typed into the command line, not the key on your keyboard.
Example Usage
-
tab 1switches to the Address Book tab. -
tab 2switches to the Events tab.
Light Mode : light
Want to use a brighter version of our UI?
Use Light mode!
Syntax
light
Dark Mode : dark
Want to use a darker version of our UI?
Use Dark mode!
Syntax
dark
UI Command Summary
| Action | Format, Examples |
|---|---|
| tab | tab INDEX |
| light | light |
| dark | dark |
Data
Saving the data
NeoBook data are saved in the hard disk automatically after any command that changes the data. There is no need for you to save manually.
Editing the data file
NeoBook data are saved as JSON files. Two of which will be of interest to you:
-
[JAR file location]/data/addressbook.json. -
[JAR file location]/data/userdata.json.
You are welcome to update the data directly by editing that data file.
However, be careful when directly editing the tagged contacts in userdata.json. It may cause the person to become unlinked from the event completely.
FAQ
Q: How do I transfer my data to another Computer?
A: Install the app in the other computer and overwrite the empty data file it creates with the file that contains the data of your previous NeoBook home folder.
Q: My NeoBook doesn’t seem to be showing up on my screen upon load. What should I do?
A: If everything is working fine (i.e. no crashes are happening and the app starts up properly), then a likely cause is that you were using a second screen. NeoBook automatically saves its last position in your screen and starts up in that same position. If you were using NeoBook on a second screen and aren’t using a second screen now, the problem is likely due to you closing NeoBook at a position on the second screen. This will lead to NeoBook opening at the same position as before, but off your screen where you can’t interact with it. To remedy this, go to the preferences.json file in NeoBook and change windowCoordinates to something that is within your first screen. (Typically x:50 and y:50 works fine).
Future Plans
- Making the following fields accept multiple parameters instead of just one.
- Since the groundwork was completed in the Tags and Modules fields, we considered it trivial to implement the rest of these fields to accept multiple parameters.
- Phone
- Address
- Race
- Communication Channels
- Major
- Faculty
- Since the groundwork was completed in the Tags and Modules fields, we considered it trivial to implement the rest of these fields to accept multiple parameters.
-
Adding better input validation to Phone, Email and Address fields, such as minimum lengths or certain formats.
-
Adding duplicate names support, which is available in most contact lists.
- Making the user’s events be able to import other contact’s events.
- Since the User is a form of Contact, it is once again trivial to extend the same functionality to other contacts
- Making NeoBook accept more symbols and emojis.
- Currently, the validation regex for all the fields for contacts do not accept special symbols (and also do not render them properly). In the future, we will attempt to add-in support for this.
- Switching to the relevant tab when a command is executed.
- Using commands for contacts in the events tab and vice versa may not show any visible changes, causing confusion in whether the user did anything.
- Certain commands should bring the user to the relevant tab, if they are not currently in said tab (e.g.
listshould navigate to the contacts tab).
- Enhancing the
selectcommand to accept parameters beyond just the index of the contact.- User cannot see the indices of contacts further down the list, and needs to scroll.
- The
selectcommand can integratefindfunctionality.
- Splitting the description field of events into title and description fields, so as not to clutter the UI with long descriptions.